Double wishbone
Two A-arms (upper + lower) locate the hub, the coilover mounts to the lower arm, and a tie rod steers it (front only). The big difference from MacPherson: there’s a real upper arm, and the shock is not a strut bolted to the hub.
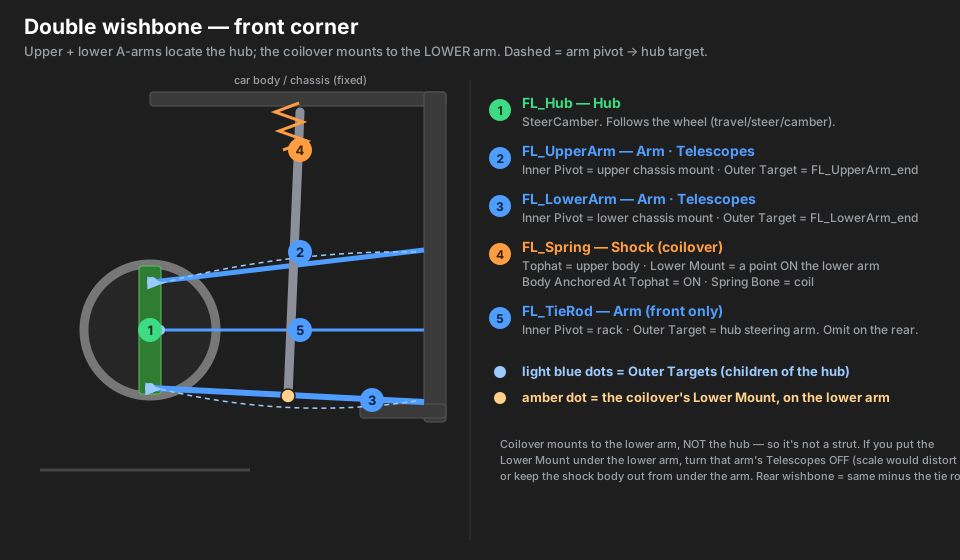
Parts → roles
| Real part | Marker | Role | Settings |
|---|---|---|---|
| upright / knuckle | FL_Hub |
Hub | Wheel Rotation = SteerCamber |
| upper A-arm | FL_UpperArm |
Arm | Inner Pivot = upper chassis mount · Outer Target = FL_UpperArm_end · Telescopes = ON |
| lower A-arm | FL_LowerArm |
Arm | Inner Pivot = lower chassis mount · Outer Target = FL_LowerArm_end · Telescopes = ON |
| tie rod (front only) | FL_TieRod |
Arm | Inner Pivot = rack · Outer Target = FL_Steer_end · Telescopes = ON |
| coilover | FL_Spring |
Shock | Tophat = upper body mount · Lower Mount = a point on the lower arm · Spring Bone = coil · Body Bone = damper (optional) · Body Anchored At Tophat = ON |
Hierarchy
FL
├── FL_Hub                Hub · SteerCamber
│   ├── FL_UpperArm_end   (no component — upper ball joint)
│   ├── FL_LowerArm_end   (no component — lower ball joint)
│   └── FL_Steer_end      (no component — tie-rod target; front only)
├── FL_UpperArm           Arm → FL_UpperArm_end
├── FL_LowerArm           Arm → FL_LowerArm_end
│   └── FL_Shock_low      (no component — coilover Lower Mount, on the arm)
├── FL_TieRod             Arm → FL_Steer_end          (front only)
├── FL_Tophat             (Shock Tophat — fixed on the body)
└── FL_Spring             Shock
Why it’s set up this way
- Upper + lower arms both carry the hub, so each gets its own Arm with a hub-side ball-joint target. Both telescope so the ball joints stay attached as the wheel travels/cambers.
- The coilover mounts to the lower arm, not the hub — so it is not a strut. Set it up as a Shock with the Lower Mount on the lower arm.
Type gotchas
- Don’t put the shock’s Body Bone under the telescoping lower arm. A telescoping arm scales
non-uniformly and would shear the strut body. Keep
FL_Spring/the body bone at the corner level; only the Lower Mount marker sits on the arm. - If the Lower Mount marker (a child of the lower arm) gets dragged by the arm’s stretch at extreme travel, turn the lower arm’s Telescopes OFF (it’ll swing rigidly; the ball-joint end may show a tiny gap, usually hidden by the hub).
- Rear double wishbone: identical, just delete the tie rod (no steering) — Hub stays on SteerCamber (you still get camber/toe).
Build order and mirroring are the same as every type — see the tutorials index.