Multilink (rear)
Several separate links locate the hub instead of one or two wishbones — typically upper, lower,
camber, and toe links, a trailing arm, plus the halfshaft and a coilover. It looks complicated, but
every link is the same Arm — there are just more of them.
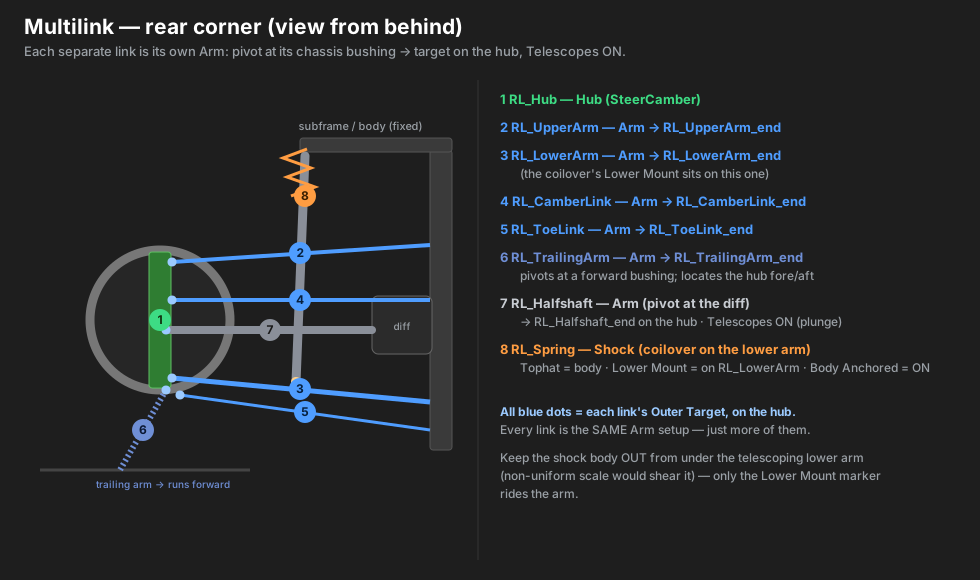
Parts → roles
| Real part | Marker | Role | Settings |
|---|---|---|---|
| upright / knuckle | RL_Hub |
Hub | Wheel Rotation = SteerCamber |
| upper link | RL_UpperArm |
Arm | Pivot = chassis bushing · Target = RL_UpperArm_end · Telescopes ON |
| lower link | RL_LowerArm |
Arm | Pivot = chassis bushing · Target = RL_LowerArm_end · Telescopes ON |
| camber link | RL_CamberLink |
Arm | Pivot = chassis bushing · Target = RL_CamberLink_end · Telescopes ON |
| toe link | RL_ToeLink |
Arm | Pivot = chassis bushing · Target = RL_ToeLink_end · Telescopes ON |
| trailing arm | RL_TrailingArm |
Arm | Pivot = forward bushing · Target = RL_TrailingArm_end · Telescopes ON |
| halfshaft / axle | RL_Halfshaft |
Arm | Pivot = the diff · Target = RL_Halfshaft_end · Telescopes ON |
| coilover | RL_Spring |
Shock | Tophat = body · Lower Mount = on RL_LowerArm · Spring Bone · Body Anchored At Tophat = ON |
Hierarchy
RL
├── RL_Hub                Hub · SteerCamber
│   ├── RL_UpperArm_end       (no component)
│   ├── RL_LowerArm_end       (no component)
│   ├── RL_CamberLink_end     (no component)
│   ├── RL_ToeLink_end        (no component)
│   ├── RL_TrailingArm_end    (no component)
│   └── RL_Halfshaft_end      (no component)
├── RL_UpperArm / RL_LowerArm / RL_CamberLink / RL_ToeLink / RL_TrailingArm   (Arms)
│   └── (RL_LowerArm has RL_Shock_low as a child — the coilover Lower Mount)
├── RL_Halfshaft          Arm  (pivot at the diff)
├── RL_Tophat             (Shock Tophat — fixed)
└── RL_Spring             Shock
Why it’s set up this way
- A multilink replaces wishbones with individual links, each pinned at its own chassis bushing. Each is an Arm that aims at its own hub point and telescopes to stay attached.
- The halfshaft is just an Arm too — its pivot is the diff (not a subframe bushing) and it must telescope (the diff→hub distance changes a lot through rear travel).
- The differential is bolted to the subframe → no component (static mesh on the chassis).
Type gotchas
- Keep the shock body OUT from under the telescoping lower arm. A telescoping arm scales
non-uniformly and would shear the strut/damper body. Put
RL_Spring(and any Body Bone) at the corner level; only the Lower Mount marker rides the lower arm. - The trailing arm runs forward to a bushing ahead of the hub — its Inner Pivot is that forward bushing. If it’s a big casting that should camber with the wheel, that’s the planned “Rigid to Hub” Arm option (see ROADMAP #4); for now a plain Arm aims fine.
- Rear hubs use SteerCamber — they won’t steer (the game doesn’t steer the rear), but you still get camber + toe.