Solid / live axle (beam axle)
A rigid beam links the left and right wheels. When one wheel lifts, the beam tilts and pushes the other side down — axle roll. Leaf springs or locating links hold the beam to the chassis. This is the one type the per-corner roles can’t fake, because every other role animates its corner independently, so it gets its own cross-corner role: Axle.
Classic on a live-axle drift car, a solid-axle swap, a truck, or anything with a diff in a tube.
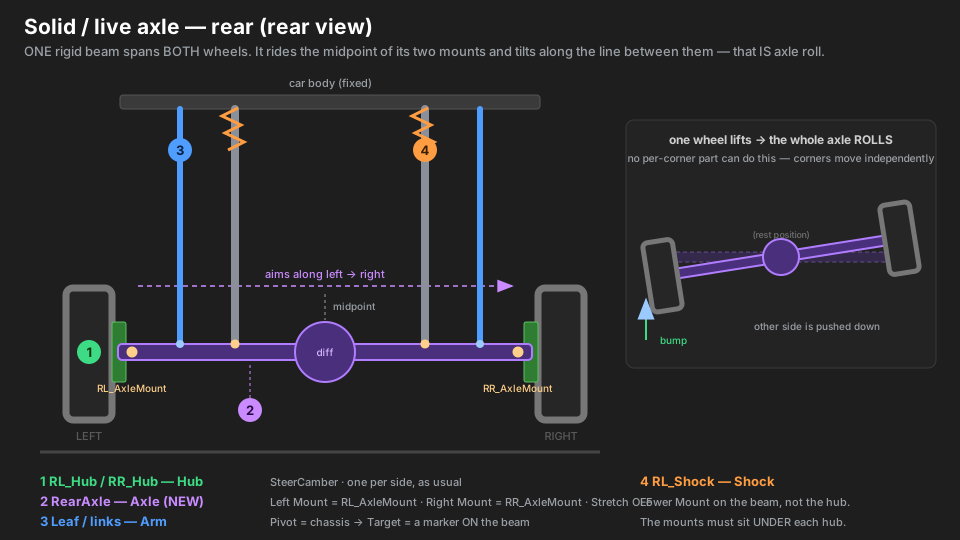
Parts → roles
| Real part | Marker | Role | Settings |
|---|---|---|---|
| upright / hub carrier (each side) | RL_Hub / RR_Hub |
Hub | Wheel Rotation = SteerCamber |
| axle beam + diff housing | RearAxle |
Axle | Left Mount = RL_AxleMount · Right Mount = RR_AxleMount · Stretch OFF |
| where the beam meets each wheel | RL_AxleMount / RR_AxleMount |
(no component) | a marker parented under that side’s Hub |
| leaf spring / trailing link | RL_Leaf / RR_Leaf |
Arm | Pivot = chassis bushing · Target = RL_Leaf_end (on the beam) |
| panhard rod / watts link | Panhard |
Arm | Pivot = chassis · Target = Panhard_end (on the beam) |
| coilover | RL_Shock / RR_Shock |
Shock | Tophat = body · Lower Mount = RL_Shock_low (on the beam) |
| brake / backing plate | RL_Brake |
RidesWithHub | — |
Hierarchy
Rear
├── RearAxle              Axle · Left = RL_AxleMount · Right = RR_AxleMount
│   ├── RL_Leaf_end          (no component — leaf/link target, ON the beam)
│   ├── RR_Leaf_end          (no component)
│   ├── Panhard_end          (no component — panhard target, ON the beam)
│   ├── RL_Shock_low         (no component — coilover Lower Mount, ON the beam)
│   └── RR_Shock_low         (no component)
├── RL
│   ├── RL_Hub               Hub · SteerCamber
│   │   ├── RL_AxleMount     (no component — the beam's LEFT mount)
│   │   └── RL_Brake         RidesWithHub
│   ├── RL_Leaf              Arm  (Pivot = chassis bushing → RL_Leaf_end)
│   ├── RL_Tophat            (Shock Tophat — fixed on the body)
│   └── RL_Shock             Shock  (Lower Mount = RL_Shock_low)
└── RR                       ... mirror of RL
    └── Panhard              Arm  (Pivot = chassis → Panhard_end)
Note the beam sits on Rear, not inside RL or RR — it belongs to neither corner. “Build Rig
Hierarchy” puts it there for you (its Corner field only picks Front vs Rear).
What makes it different
- It’s the only cross-corner role. Every other marker reads one corner; the Axle reads two. That’s the whole point — independent corners can’t produce axle roll.
- The beam rides the midpoint of its two mounts, so it heaves and pitches with the average of the two wheels, and aims along the left→right line. That line tilting is the roll — you get it free, with no roll maths to tune.
- The mounts do the driving.
RL_AxleMount/RR_AxleMountare plain markers under each Hub, so they inherit the wheel’s travel. Move the wheels, the mounts move, the beam follows. - Everything else is ordinary. Leaf springs, panhard rods and locating links are just Arms (chassis pivot → a target on the beam); coilovers are just Shocks with their Lower Mount on the beam. No new concepts.
Setup, step by step
- Put a Hub on each side as usual (
RL_Hub,RR_Hub, SteerCamber). - Add an empty under each hub where the beam meets that wheel:
RL_AxleMount,RR_AxleMount. No component on these — they’re just markers. - Put a KSuspBone on the beam mesh, Role = Axle, and drag the two mounts into Left Mount and Right Mount. Leave Stretch OFF.
- Add empties on the beam for anything that bolts to it (
RL_Leaf_end,RL_Shock_low, …). - Rig the leaf springs / links as Arms pointing at those, and the coilovers as Shocks with their Lower Mount on the beam.
- Build Rig Hierarchy → Bake .ksusp. The bake report should say
baked N corner(s) and 1 axle(s).
Type gotchas
- Left and Right, not front and back. The beam aims along left→right. If you feed it two markers on the same side (or the same marker twice) it has no direction — the baker refuses and warns.
- Mounts must be UNDER the hubs. A mount left on the chassis never moves, so the beam won’t follow travel at all. The baker warns: “Left Mount … is not under a Hub”.
- Stretch OFF. A real beam is rigid and track width doesn’t change; leave it off unless the beam mesh visibly pulls off its mounts.
- Shocks go on the beam, not the hub. On a live axle the coilover lands on the axle tube. Point the Lower Mount at a marker parented to the beam so it rides the beam’s roll.
- Don’t also make the beam a RidesWithHub. That would bolt it rigidly to one wheel and it would ignore the other side entirely.
- Camber is the game’s, not the beam’s. A real live axle keeps the wheels perpendicular to the beam. CarX still gives each wheel its own camber, and the Hub shows it via SteerCamber — so at big articulation the wheels may not look perfectly square to the tube. The beam itself is right.